Tuesday, December 28, 2010

401st post! Unknown give away! That makes the 18th

Wow, what a way to end the year. Good friends, good food, and my 400th post.
This is the 401st.
I for one, am very surprised.
I didn't even want to do this blogging thing. I needed to find a way to promote myself and my hubby's store with out spending gobs of money. I needed to get back into the swing of things after several hits to my heart and ego. I had to find the self that I had lost and find new people to believe in and trust again. I have gained so much more.

It has been a long journey, this blogging road. It has been interesting, the people I have met are very unique and so very talented. I ended up making friends, many of them. Kindred spirits with light in their eyes and so much to share with others on the same path. It feels good. I don't mean to get maudlin, but I need to do this, I need to see how far I have come, because to tell you the truth, when you are I am standing in the midst of your my own life, the everyday caca can sometime swamp you or I should say me. I call those Sh_t tsunamis. Standing so close to everything it is hard to see anything but a huge wave of it.

I got to have this forum on my terms, posting the things I want to post, with the products I want to use and do the projects I want to do. I did it my way ;-D, right or wrong.

All in all it has been very rewarding now that I look back at the year. I guess this why we do this at this time of year, to take stock of all the events positive and negative to see what we can keep and what we can toss, to make the next year better than the last. I am wondering if I should even label them positive or negative? Some of the things that I thought were positive have turned out different and vice versa. So maybe I should just call them speed bumps or even just events and remain as detached from any outcome as I possibly can. Not to judge but to just be there for all of it.

Baring unforeseen events, I can move forward in to the rosy future.

I feel I have grown, I have been scared a lot of the time, felt that I had no net most of the time, and found out that all I need is inside. I have tools. I have learned new things, one day at a time, I am still learning and I want to keep going. This is good, this is very good!

I am so sorry if I haven't been by, I have an almost 2 year old that runs my life now. I drop by every once in a while and read, maybe comment, but everyday I think of you and I am grateful for you. I am hoping some day I will get this kid thing all figured out, I mean after all, I did it before. I am just a lot older and she is just really smart and really busy, a good girl! She says "Hi".

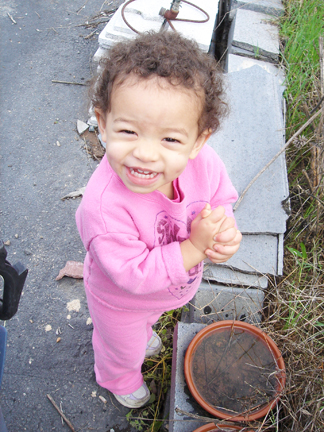
She smiles at me and says "gamma, hand" and I have to put mine in hers and go. To follow where she leads and to see the world through those bright young eyes!

I am going to have a quick giveaway before One World One heart comes at the end of this month, so if you want to win something (I haven't decided what yet) put your name in this post.
I will get the rules up later, I just want to say thank you and Have a wonderful New Year all of you!
Know that I think you are all perfect and you have something beautiful inside of you!
Share that with those you love.
We will all be better off for it.
And please keep sharing with me. I am better because of all of you.
Thank you!

I am going to leave you with something one of my new blog friends said to me. It rocked my world.

"Create your life like you create your art - you have that power. -Donna, the Woodwife"

Friday, December 24, 2010

Have a very Merry, all of you!

This is what helped my holiday blues, good friends, cookies and a dieter's nightmare.
Oh and Christmas music.
Whatever winter Holiday you celebrate, whatever winter Holiday you have celebrated, or whatever winter Holiday you are going to celebrate, may it be with people you love.
May there be food in your stomach and heat in your hearth.
May you have friends by your side.
May you have love in your heart.
My heart is filled with gratitude for each and every one of you!

I sometimes forget that when a door to change is getting ready to appear that the change feels intense and chaotic right before the opening.
This is almost a daily occurrence lately, do you feel it too?
It does not mean it is bad, just uncomfortable.
Maybe the universe is conspiring to help me.
Ya, I think I will choose to think that one!
Love and huge hugs to you all.
I will be back soon to show you some of what I did over the holidays and getting ready for it.

Thank you to two beautiful women who shared their day with me.
They know who they are.
You helped so much!

Monday, December 20, 2010

Monday Updates- drip drip drip

It seems as if it has been raining for days. I am a bit melancholy these holidays, I am missing parts of my family. Oh, I have my kids, my hubby, and Madi and some very dear friends, but I am missing ones that have moved and ones that have died.

Thank you all for your well wishes and kind thoughts last time I posted, it made me feel so much better.

I am trying to make my Christmas presents as fast as I can, but I feel that time is running out and I might never complete everything. My get up and go, got up, and left.
At what point should I give up?
I guess I should just keep plugging away until the final hour, the last moment, and the ending second.
I have been stitching a bit, it seems to calm me a little.
I made these sachets and stuffed them with lavender.
This is the first one I made, it is not very good, it was a trial run. It is going to stay with me now.
I used the printable cotton, some images from Dover, and some clay pieces I made, ribbon, embroidery thread, and felt.
You can sign up for free samples from Dover on that opening page down on the left a little.
This one is a color image from a Dover sample and I did a much better job on this one.

I am thoroughly enjoying how these are coming out and it is good TV sitting work.

I hope you all are doing much better than I am and if you have any ideas on how to beat the holiday blues, I would sure love to hear them.

Friday, December 17, 2010

I am taking a small break


Tattoo you new in my shop art from my heart.
I can still get it to you in time in the states ;-D


 I am tired and in need of a small break to catch up on things.
Take some time for myself and just take some of the pressure off.
I also need to get the caca off my desk so I can keep working. LOL!
It seems like I have been blogging non-stop lately.
I am not taking long and I will probably post again this weekend.
I have some new stuff in my shop Art from my heart if you want to check it out, I am grateful for you looking.
I will see you soon, all of you have a wonderful friday.
I am searching for some holiday cheer, see you soon!!
Love and hugs.

Tuesday, December 14, 2010

Fave Crafts Blog hop today- December

Click on the picture above and it will wisk you away to the Blog Hop!
Hi Fave Crafts Blog Hoppers, welcome!
Take off your shoes, sit down in the over stuffed chair by the fire, have a moment of peace at this busy time of year. Would you like a cookie? A cuppa?? A back massage???
Just breathe!!
Do it with me, take a deep breath in slowly one...two...three...four...five... right to your heart...seven and breathe out all stress, rushing, and relax one... two...three... all the dark and grungy thoughts and emotions...five...six... you are loved!!!

December is rushing by at the speed of light. I feel a little crazy and I am still working on Christmas presents. That is one thing that having money would do for me, I could go buy everything in the summer and just relax for once for Christmas.
Those laughing people you see during the holidays have money or they are on the very edge of sanity. I would be the latter.
I am though, glad you stopped by and I needed to breathe too!


I have a quick Christmas ornament I want to share with you.
Here is part one
Here is part two


And now to part three...

You will need:


Cernit Lemon and Glamour White
Wire cutters
18 or 16 gauge red colored copper wire
A Sharpie fine point permanent marker
A 1" star cutter
Bamboo skewer
Star Stamp I used a retired Stampin' up Christmas star stamp
Pearl-ex Powder Aztec gold


Mix the white glamour and the lemon together one to one until one color.


Roll the mixed color through the pasta machine on the thickest setting.


Stamp the sheet with the stamp.


Rub on the Pearl-ex Aztec gold powder with your finger.


Cut out with the star cutter and poke a hole in the top with the bamboo skewer.
Pick up the star gently and make the hole bigger with the skewer.
Bake in a preheated 275 degree F. oven for 25 minutes shut off oven and let cool.


While the star is cooling take the wire and holding one end of it on the pen, wrap the other end around the shaft of the pen.
Wrap tight as you can and wrap down and close to the last wire.
It feels like you are pulling the end wire down and next to the last turn on the pen as you go.


Pull off the coil and the cut off the end of the wire that is left, face the flush side of the cutter toward the spiral.


Grab the next turn of the spiral with your cutters and face the flush side of the cutters away from you and cut the wire right at the end that is above the turn you are cutting.


The ends should be almost matching.


The wire loop should be a little apart and one end will almost be above the bottom one.
Pull them just a bit more apart the way they naturally come apart.


Thread on the star through the hole.


Hold the other side of the loop and thread on the tree.

I am holding this with the wrong hand because that hand is taking the picture ;-D.


Move the ends gently back together. Sometime I have to go past one of the wire and move it back to get it in the right place too.


The Ornament is now done.


And you have the hints for the necklace, and the gift tag and you could also leave both holes out and make a brooch out of this too. Oh and don't forget about an embellishment for a card or scrap book too.


I also finished this project and tutorial Marie-Tangle beads
Part one

Part two

Part three


I finished this Steampunk Album with my friend Jodi. Click on the picture to see some pictures of our progress. From there you can see part one.


I also almost finished a doll using printable cotton paper and one of my own designs here


Here is last months Blog hop if you are interested http://mariesegal.blogspot.com/2010/11/fave-crafts-blog-hop-today-november.html

Cotton Paper Play

This is my 200th post this year. I am really proud of myself for keeping this going, no matter what! I am really close to 400 posts for my blog history. I will have to see when it is.
It makes me laugh to think I could think of nothing to say in the beginning.
I am giving you all a shout out for hanging in there with me, I appreciate all of you!!
Thank you!

I had shown you the butterflies I had done before here.

Well, I decided to take some of my EyeDollz and make them in to stuffed goodies for Madi!


Meet EyeloveU and Eyedolleyesbling, two of my favorites.
I printed them out on the printable cotton in my ink jet printer, I increased the resolution on the photo and increased the quality on the print out.


I put my paper in my printer (I suggest you print out a regular piece of paper first before you put the cotton in just to make sure you know which way to put it in to your printer) and press print...tah-dah.
I cut around the EyeloveU and left an allowance and then I cut out 2 pieces of purple felt and made an allowance on that too.


I pinned him to one of the pieces of felt.


I stitched EyeloveU to one piece of the felt with embroidery thread and a blanket stitch then I stitched the two pieces of felt together the same way.
I left the bottom of his foot open and I am going to stuff him. I am going to use an old pillow we have and recycle it. I will just wash it and throw it in the dryer. It is filled with polyfill
I may even paint him with some Lumiere and add some ribbon too.
Why aren't there 48 hours in a day??
And the printable cotton sheets are perfect for doodling on too, even painting on with fabric paints or pens and using in a quilt or on a shirt, maybe a purse or apron too.

Monday, December 13, 2010

One World One Heart is coming again 2011.


IT WILL BEGIN ON SUNDAY JANUARY 3OTH WITH THE FINAL DAY BEING FEBRUARY 17TH.(the day winners are announced) 2011.
Click the picture to go to the instructions. This will be the last year. Lisa works very hard on this.
I met so many awesome people last year!! It is such a nice blog happening, but there are rules and it is good to read them ahead of time.
You don't have to post and you can just visit the blogs (People gave away awesome things last year) but the more the merrier and let's all send Lisa and One World One Heart off with the biggest event ever.
It is not about the goodies that the bloggers give away though, it is about all the bloggers of virtue you will meet.  So many with so much to offer.
Nobody says it better than Lisa though, click on the picture above for the rules.
Check out Lisa's talent at the A Whimsical Bohemian.
Thank you so much Lisa for all of your hard work and love.

Sunday, December 12, 2010

Christmas tree ornament part 2

From part 1
This is for the wire part.

Side cutters

chain nose pliers
round nose pliers
Nylon jaw pliers
18 or 16 gauge red colored copper wire


I used 1 gauge wire for these, but the 18 gauge works just as well and is a bit easier to work with.


Start a spiral with the chain nose pliers.


With the nylon jaw pliers grab the spiral and keep rolling it up. The nylon jaws keep from scratching the wire color off.


Make it about 3/8"  or a tiny bit bigger.


Fold the wire over the spiral you just made and press flat with the nylon jaw pliers.


Bend the end wire up right in the middle of the spiral with the chain nose pliers.


Put the end wire in to the front of the tree in the top hole.
Bend the end wire up as close to the tree top as you can.
I hold the spiral with my thumb and bend the wire against the back of the tree at the top with my other hand.

You can if you want flatten it with the nylon jaw pliers.


With the chain nose pliers bend the end wire over the top of the star a little.
Or you can do it with your fingers.


Take the chain nose pliers and bend the end wire straight up now. You grab the wire at the bottom of the wire right at the front of the tree.


Grab the wire and hold it close to the last bend and then bend it at a right angle.


Grab the wire right at the bend with the round nose pliers and roll the wire over the round nose.
Keep holding the wire with the round nose pliers while you do the next step.


Grab the end of the end wire with the chain nose pliers in your other hand and pull the end all the way around the round nose pliers. Continue wrapping the end of the end wire around the  the up wire underneath of the loop.
Keep wrapping until the loops reach the top of the tree.


Take the end of the end wire and bring it down in front of the tree top and wrap that around the wire underneath the spiral.

Clip off the end with your side cutters underneath the spiral so it doesn't show.


Flatten the spiral and the loop with the nylon jaw pliers.


It will look like this in the front.


And this in the back.


I added a holly and berries for a necklace and left it plain with out a hole in the bottom of the tree for the Christmas present tag.

I will come back and show you how to make the holly and attach it and how to finish the ornament next.
Stay tuned for part 3.
http://mariesegal.blogspot.com/2010/12/fave-crafts-blog-hop-today-december.html

Saturday, December 11, 2010

Christmas tree ornament

These are fast and easy and might be just the ticket for a quick gift.

Cernit in pearl green and Verdi gris
Aztec gold Pearl-ex
Blade or craft knife
Christmas tree stamp- mine is old and from Stampin' up
3 hot set red rhinestones
18 or 16 gauge red colored copper wire
Clay machine
Bamboo skewer or knitting needle
Side cutters
chain nose pliers
round nose pliers
Nylon jaw pliers

Condition and roll out 1 1" ball of each Verdi gris and pearl green.


Roll into short coils about 1 3/4" long.


Twist together.


Pancake the clay.


Stamp the clay sheet with your christmas tree stamp of choice. Press in well, but not too much to cut through the clay.


Cut around the tree with your blade or craft knife leave at least an 1/8" all the way around the tree.


Poke a hole in the star at the top with your bamboo skewer.
Widen the hole,by picking the tree up gently and drilling in to the hole.


Poke at the bottom too and widen the hole too.


Open the jar of pearl-ex and put a small bit in the lid. Rub your finger in the lid, get the clumps off and rub on to the tree. Do not press hard but rub in circles. Completely cover the tree.


Add red rhinestones.
Bake in your oven at 275 degree F. for 25 minutes and shut off the oven and let cool in the oven.
This a great project for kids.
Come back for the wire parts!!

To be continued.
Part 2
http://mariesegal.blogspot.com/2010/12/christmas-tree-ornament-part-2.html

Part 3
http://mariesegal.blogspot.com/2010/12/fave-crafts-blog-hop-today-december.html