

Sunday, October 31, 2010
Friday, October 29, 2010
Playing with my food again-episode 5, part 3
This is a 3 part saga and you can see the other installments
here
http://mariesegal.blogspot.com/2010/10/playing-with-my-food-again-episode-5.html
and here
http://mariesegal.blogspot.com/2010/10/playing-with-my-food-again-episode-5_27.html
After we had the fence and the tree placed, we added the house. It looked good so we added some tombstones.
 I marbled black and white fondant together and cut out the shape with my blade. I used the green tool(the one with a pointed end) and drew around the outside. I used the knife ended one to make cracks in one of the stones. I "wrote" RIP on the front of one.
The leaves you see are pushed in to one of the leaves on the floral push mold. I did several different kinds of leaves to change it up a little. The leaf you see is really one of the flowers though. ;-D
 We covered a cupcake with fondant and placed it on the end of the skewer and on top of the trunk. If it is a long skewer you have to cut it with cutters so I will not stick out the top of the cupcake.
We placed some of the frosting on the back of the leaves and "glued" them to the cupcake covered in fondant.
I also took 1" balls of orange fondant that I had colored myself with gel food coloring which you can also get at Pila's, made lines all the way around them with the knife-like green tool and with the pointed-end tool I poked a hole in the top where the lines met.
I took a very small ball (3/16") of chocolate fondant and rolled it into a small teardrop and placed it in the hole in the top of the pumpkin for a stem.
I then roll 2- 3/16" balls of green fondant in to teardrops and flattened them for each pumpkin and made leaves. I then placed those on top of each pumpkin with a tiny tiny bit of water (remember from previous episodes, that water breaks down fondant), to "glue" them in place.

 I decided to put in a little ghost in the doorway. I took a 1 1/2" ball of white and rolled it in to a teardrop with a rounded point and the on the thicker end, flatten it out, then add two small 1/2" balls of white fondant for the arms. Roll them in to teardrops and place the thick ends against the ghosty's body. I made a mark for the mouth withe pointed end tool and painted chocolate frosting eyes.
 This is the cake after everything was added.
We brushed the leaves of the trees with the green metallic powder.
Pretty spooky, eh?

Here is a close up of the leaves.
I wonder if Duff is hiring?
This concludes the 5th episode.
here
http://mariesegal.blogspot.com/2010/10/playing-with-my-food-again-episode-5.html
and here
http://mariesegal.blogspot.com/2010/10/playing-with-my-food-again-episode-5_27.html
After we had the fence and the tree placed, we added the house. It looked good so we added some tombstones.

The leaves you see are pushed in to one of the leaves on the floral push mold. I did several different kinds of leaves to change it up a little. The leaf you see is really one of the flowers though. ;-D

We placed some of the frosting on the back of the leaves and "glued" them to the cupcake covered in fondant.
I also took 1" balls of orange fondant that I had colored myself with gel food coloring which you can also get at Pila's, made lines all the way around them with the knife-like green tool and with the pointed-end tool I poked a hole in the top where the lines met.
I took a very small ball (3/16") of chocolate fondant and rolled it into a small teardrop and placed it in the hole in the top of the pumpkin for a stem.
I then roll 2- 3/16" balls of green fondant in to teardrops and flattened them for each pumpkin and made leaves. I then placed those on top of each pumpkin with a tiny tiny bit of water (remember from previous episodes, that water breaks down fondant), to "glue" them in place.

Here you can see how we are painting the inside of the windows with chocolate frosting so that pink marshmallows do not show. Pink marshmallows do not really go well with this cake. ;-D
 I decided to put in a little ghost in the doorway. I took a 1 1/2" ball of white and rolled it in to a teardrop with a rounded point and the on the thicker end, flatten it out, then add two small 1/2" balls of white fondant for the arms. Roll them in to teardrops and place the thick ends against the ghosty's body. I made a mark for the mouth withe pointed end tool and painted chocolate frosting eyes.
We brushed the leaves of the trees with the green metallic powder.
Pretty spooky, eh?

Here is a close up of the leaves.
I wonder if Duff is hiring?
This concludes the 5th episode.
Wednesday, October 27, 2010
Playing with my food again-episode 5, part 2
This is a continuing saga you can see the first installment here.
http://mariesegal.blogspot.com/2010/10/playing-with-my-food-again-episode-5.html
We frosted a 6" double layer cake with chocolate frosting.
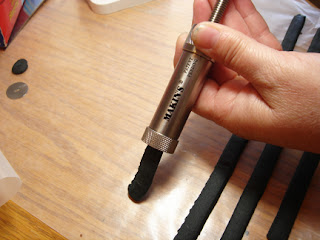
We extruded black fondant with the stainless steel Clay Extruder. I use the large trapezoid comes with disk set 1- M35155.
We extruded the full barrel of fondant and left them on the wax paper.

We cut 3 short ones (about 2") and then a long one (about 3") sections. We used 4 long ones and placed them on the north, south, east and west section of the cake on the sides.
We placed the 3 short sections in each of the areas left. We spread them evenly apart.

Then I extruded a cord of black fondant and draped it between each of the black posts.
We cut out four of the heart looking flower petals in the Flower/Leaves cutter set and placed those a top each long post, points up. I used the petal in this clay project if you would like to see the shape of it
We brushed the wrought iron fence with silver pearl powder on one side of each post. Also a little of it on the cord.
You can see our tree in the foreground, with it's pink marshmallows inside.

http://mariesegal.blogspot.com/2009/04/playing-with-my-food.html
Here
http://mariesegal.blogspot.com/2010/09/playing-with-my-food-again-episode-2.html
Here
http://mariesegal.blogspot.com/2010/09/playing-with-my-food-again-episode-3.html
Here
http://mariesegal.blogspot.com/2010/09/playing-with-my-food-again-episode-4.html
http://mariesegal.blogspot.com/2010/10/playing-with-my-food-again-episode-5.html
We frosted a 6" double layer cake with chocolate frosting.

We extruded black fondant with the stainless steel Clay Extruder. I use the large trapezoid comes with disk set 1- M35155.
We extruded the full barrel of fondant and left them on the wax paper.

We cut 3 short ones (about 2") and then a long one (about 3") sections. We used 4 long ones and placed them on the north, south, east and west section of the cake on the sides.
We placed the 3 short sections in each of the areas left. We spread them evenly apart.

Then I extruded a cord of black fondant and draped it between each of the black posts.
We cut out four of the heart looking flower petals in the Flower/Leaves cutter set and placed those a top each long post, points up. I used the petal in this clay project if you would like to see the shape of it
We brushed the wrought iron fence with silver pearl powder on one side of each post. Also a little of it on the cord.
You can see our tree in the foreground, with it's pink marshmallows inside.

We placed the tree trunk on the cake and press the skewer down through the marshmallows and in to the cake.
Stay tuned for part 3...
I have been playing with my food for a while and you can see the others...
Herehttp://mariesegal.blogspot.com/2009/04/playing-with-my-food.html
Here
http://mariesegal.blogspot.com/2010/09/playing-with-my-food-again-episode-2.html
Here
http://mariesegal.blogspot.com/2010/09/playing-with-my-food-again-episode-3.html
Here
http://mariesegal.blogspot.com/2010/09/playing-with-my-food-again-episode-4.html
Monday, October 25, 2010
Playing with my food again-episode 5, part 1
I am playing with my food again and you can see the previous installments,
Here
http://mariesegal.blogspot.com/2009/04/playing-with-my-food.html
Here
http://mariesegal.blogspot.com/2010/09/playing-with-my-food-again-episode-2.html
Here
http://mariesegal.blogspot.com/2010/09/playing-with-my-food-again-episode-3.html
Here
http://mariesegal.blogspot.com/2010/09/playing-with-my-food-again-episode-4.html
This one is going to be about using those fabulous clay tools called Texture plates for your food. Not just clay tools anymore.
This got me to thinking, when I first started working with polymer clay in 1978, I use my ceramic tools and kitchen tools.
I think I can say I have come full circle to using my clay tools for food now.
I have learned that I do not put labels on my tools now. If I find it at a hardware store and it works, it is a tool. If I find it in nature and it works, it is a tool. Now, tools are everywhere!!!
I do suggest though that if you are going to use the texture plates for food that you get a new set. These are inexpensive and will be used over and over again if you are having as much fun playing with your food as I am.
They can also be used as large stamps, crayon rubbings, texturing plaster, texturing paint, or even cement and probably a lot more things than I can think of right now!
So we will play with the texture plates and then from there we will move in to the project Jodi and I made from this.
Just in time for the upcoming Halloween Holiday!
Links will take you to the corresponding page in my Hubby's on line store, http://www.clayfactory.net/. Thank you for supporting my family and myself.
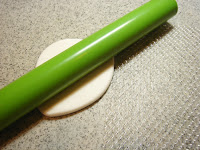
I rolled out my fondant to about 1/8 " with the green roller.
 Place the texture sheet over the rolled out fondant. I used texture sheet set M38004, this has the scale and the wood grain in it.
We are going to use both of them for this blog.
 Press down on the roller and slide across the texture plate. You could roll it also, but I found that just pressing and sliding worked very well.
If you are going to roll the fondant in to the texture sheet then the roller has something to grab on to. It is easier to roll then.
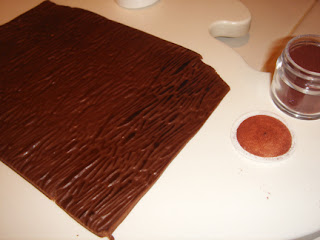
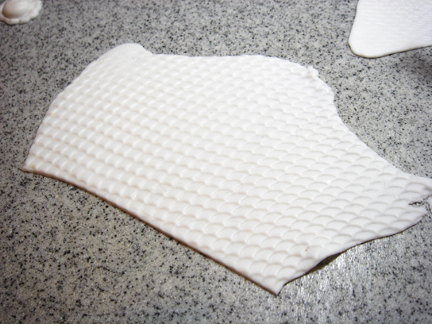
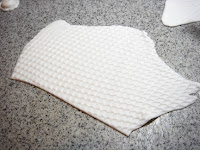 This is how the fondant looks after the texture sheet is removed. I did not use anything on the fondant to resist the texture sheet, but you could use shortening or powdered sugar as a releasing agent.Click on the picture for a larger view.
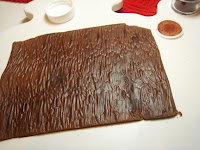
 Here is the wood grain texture sheet. I used the chocolate fondant from Pila's Pantry, (this one is my all time favorite fondant, it tastes like tootsie rolls) and followed the instructions above to make this sheet of wood grained texture.
 Here I have tried to get the variation in the color by using the powdered pigment. You can click on the picture to see a larger version of this picture.
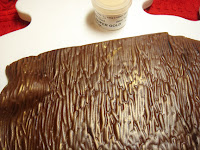 I also brushed on some of the Pearl pigment for food, this one is called gold dust.
Fun, fun, fun!
 We then took a bamboo skewer and placed three large marshmallows on it. Wrapped the wood grain fondant around them and sealed the seam with a little water. I let the bottom crack instead of cutting it off and featured the cracks as roots.
We put this aside and continued on to the next part.
 With the scale texture plate, some black fondant and the instructions on how to roll out the fondant and tah-dah, some scale textured black fondant. We then high-lighted that whole sheet with silver powder to get this. Click on the picture for a bigger view.
This is one of my very favorite textures in clay or food.
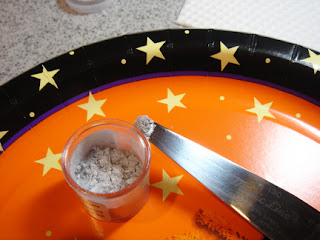 I add the powder to the fondant like this. I take out a small amount with a knife or spatula and place it on a paper plate then close the lid on the jar.
 I then spread the powder out with my finger so I have no clumps and brush on to the fondant. If I do not do this the clumps will fall off my finger and cover everything not just the high spots on the texture.
We saved all the trimmings too, just in case we might need them later. We did.
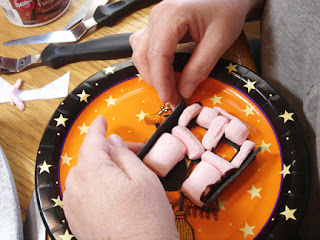 We laid the front of the house on a plate and then we cut pink marshmallows in half (it was what we had ;-D) to make it the right thickness and "glued" them to the back with the chocolate icing. The marshmallows cut very nicely with a pair of kitchen shears.
We "glued" on the sides and the back of the house with chocolate frosting, Added the roof which was just more of the scale textured fondant, added a chimney, painted the pink marshmallows that showed inside the windows with chocolate frosting and set the house aside.
I am so sorry there are no pictures for this, we both got so involved with what we were doing, we forgot to take them.
Stay tuned for part 2...
Here
http://mariesegal.blogspot.com/2009/04/playing-with-my-food.html
Here
http://mariesegal.blogspot.com/2010/09/playing-with-my-food-again-episode-2.html
Here
http://mariesegal.blogspot.com/2010/09/playing-with-my-food-again-episode-3.html
Here
http://mariesegal.blogspot.com/2010/09/playing-with-my-food-again-episode-4.html
This one is going to be about using those fabulous clay tools called Texture plates for your food. Not just clay tools anymore.
This got me to thinking, when I first started working with polymer clay in 1978, I use my ceramic tools and kitchen tools.
I think I can say I have come full circle to using my clay tools for food now.
I have learned that I do not put labels on my tools now. If I find it at a hardware store and it works, it is a tool. If I find it in nature and it works, it is a tool. Now, tools are everywhere!!!
I do suggest though that if you are going to use the texture plates for food that you get a new set. These are inexpensive and will be used over and over again if you are having as much fun playing with your food as I am.
They can also be used as large stamps, crayon rubbings, texturing plaster, texturing paint, or even cement and probably a lot more things than I can think of right now!
So we will play with the texture plates and then from there we will move in to the project Jodi and I made from this.
Just in time for the upcoming Halloween Holiday!
Links will take you to the corresponding page in my Hubby's on line store, http://www.clayfactory.net/. Thank you for supporting my family and myself.

I rolled out my fondant to about 1/8 " with the green roller.

We are going to use both of them for this blog.

If you are going to roll the fondant in to the texture sheet then the roller has something to grab on to. It is easier to roll then.
 This is how the fondant looks after the texture sheet is removed. I did not use anything on the fondant to resist the texture sheet, but you could use shortening or powdered sugar as a releasing agent.
 Here is the wood grain texture sheet. I used the chocolate fondant from Pila's Pantry, (this one is my all time favorite fondant, it tastes like tootsie rolls) and followed the instructions above to make this sheet of wood grained texture.
I then used some matt brown pigment I also bought from Pila's to highlight the texture of the wood grain. Put some on your finger as if it was pearl-ex and spread on the sheet of fondant wood grain. Or you could use a soft brush to place it on the fondant. The soft brush will though cover the whole surface not just the high spots.


Fun, fun, fun!

We put this aside and continued on to the next part.

This is one of my very favorite textures in clay or food.

 I then spread the powder out with my finger so I have no clumps and brush on to the fondant. If I do not do this the clumps will fall off my finger and cover everything not just the high spots on the texture.
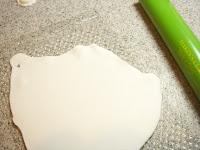
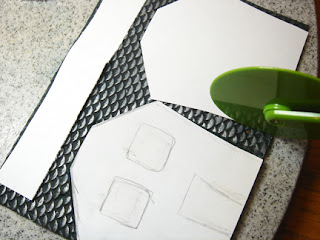
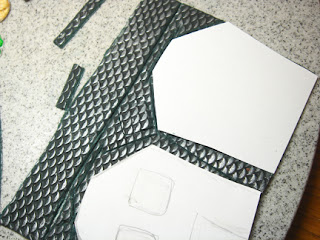
We then drew up a small simple stencil on paper for a house. Cutting it out with the rolling cutter which is part of the rolling pin set.
The top strip is going to be the sides of our house.

We saved all the trimmings too, just in case we might need them later. We did.

We "glued" on the sides and the back of the house with chocolate frosting, Added the roof which was just more of the scale textured fondant, added a chimney, painted the pink marshmallows that showed inside the windows with chocolate frosting and set the house aside.
I am so sorry there are no pictures for this, we both got so involved with what we were doing, we forgot to take them.
Stay tuned for part 2...
Saturday, October 23, 2010
From Plain to Fabulous- a step by step story, part 2
This is continued from Part 1 here http://mariesegal.blogspot.com/2010/10/from-plain-to-fabulous-step-by-step.html
 Stamp in to the surface of the clay with a rubber stamp. I place my hand on the underside of the lid and then press the stamp against my hand to make a deep impression. If you have put too much glue on at this point you will know. The clay will start sliding around. Let it sit for a bit and the continue. Press the stamp straight down.

 |
| We are making this box |
 Stamp in to the surface of the clay with a rubber stamp. I place my hand on the underside of the lid and then press the stamp against my hand to make a deep impression. If you have put too much glue on at this point you will know. The clay will start sliding around. Let it sit for a bit and the continue. Press the stamp straight down.
Stamp the whole surface of the clay.

Place the believe banner on the surface and arc it up a little.
Roll out some more black clay on the thickest setting and cut out 3 of the oak like leaves in the cutter set. With the back of your clay slicing blade make the center vein in the leaves and then mark the outside veins. I have placed one leaf right under each side of the banner and then I placed one in the bottom point of the heart which will show in the next picture.
 Take 2- 1/8" balls of clay and place one on each side of the banner. Using the handle of a paint brush or the end of a small crochet hook make a indent right in the middle of the balls.
 Place a smaller ball in each indented ball.


Make a mark in the center of the smaller ball to make it look like a screw.

Cut out 5 of the petal shape you see here. The one that sort of looks like heart.
Bend the petal over your finger like this. This will put a little curve in the petal.
 Make lines with a dull knife or the back of the blade on each petal in a fan shape to the point of the petal.
 I used a 1/2 ball of clay for the center and it shows that I used the screen piece to make texture in the center after I placed it in the flower, but it is much easier to press the 1/2" ball in to the screen and then place it in the center of the flower.
Paint the powders on with a soft, soft brush or your finger on the lid and bake in a 275 degree pre-heated over for 30 minutes and shut off and let cool in oven.
Once cool paint the lid and the box inside and out with several coats of True Gold Lumiere, letting each coat dry before applying the next one.


Cut out 5 of the petal shape you see here. The one that sort of looks like heart.
Bend the petal over your finger like this. This will put a little curve in the petal.


Paint the powders on with a soft, soft brush or your finger on the lid and bake in a 275 degree pre-heated over for 30 minutes and shut off and let cool in oven.
Once cool paint the lid and the box inside and out with several coats of True Gold Lumiere, letting each coat dry before applying the next one.


Tah- dah!!
Thursday, October 21, 2010
16th giveaway winner- Mrs.B and me, gone batty!

16th Giveaway
http://mariesegal.blogspot.com/2010/10/mrs-b-is-having-giveaway-and-one-of.html
Closed
Winner #10 picked random number generator
Scrapbookdoll
contact me with your shipping address by the 23rd of October, 2010
or I pick another winner!
Wednesday, October 20, 2010
Wednesday Wonder-Gum Wrapper Chain to Arm Candy
OK, I used to make gum wrapper chains, fun, everyone did it when I was in school. I just made long chains though.
Not as long as this guy though. Gary Duschl
Damn Gary, that is a lot of gum!
My daughter has a frame that someone made her while he was in jail. I think it is most beautiful and quite inventive, considering it is all gum wrappers.
Gum wrapper art is not just Jail house fare any more though.
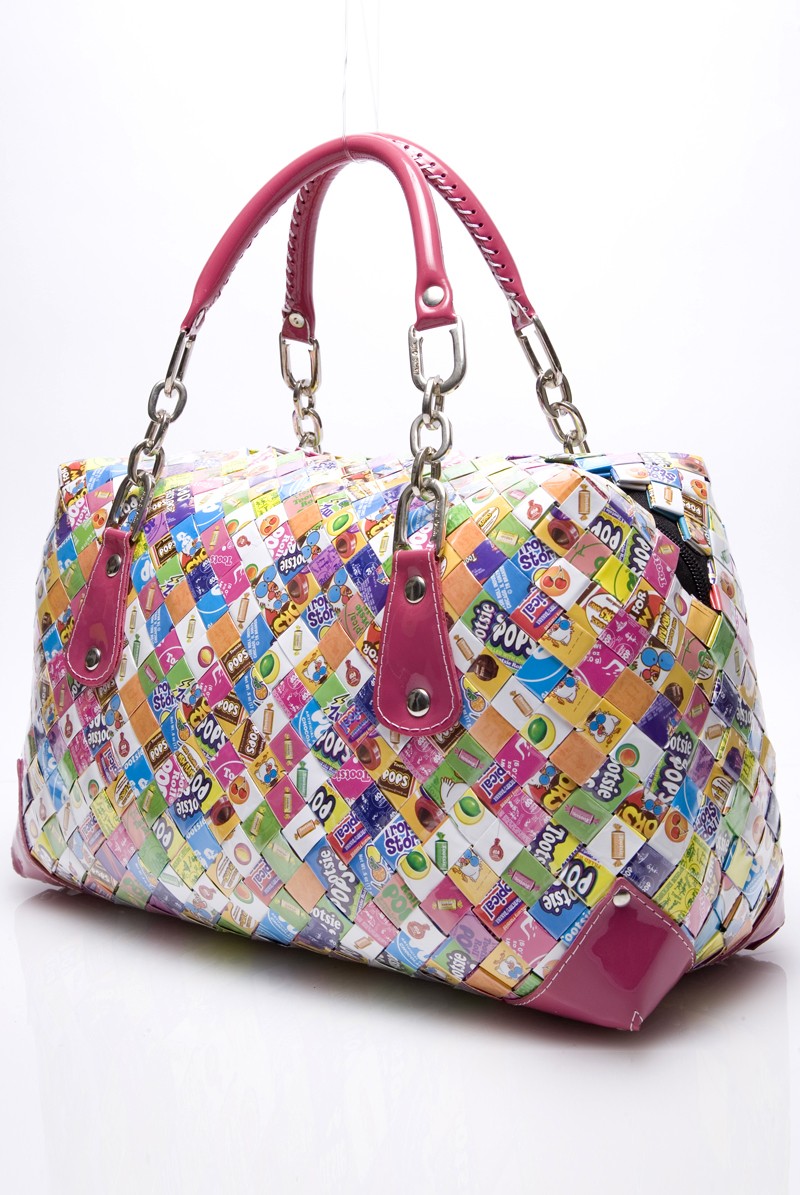
Oh wow, gum wrapper wear has become ultra chic and very cool. I love this Tootsie roll bag from Nahui Ollin. You have got to check this out. These bags are nice, very nice.
The detailing and finishing on them is wonderful and they are quirky, I like quirky.
I mean seriously folks, this is a nice bag! And way to recycle kids.
Here is the Junior Mint line, I wonder if it is minty fresh too?
Here is a great tutorial and information from eHow.com
http://www.ehow.com/how_5187867_make-crafts-gum-candy-wrappers.html
Not as long as this guy though. Gary Duschl
Damn Gary, that is a lot of gum!
 |
| photo from Gary's website, click on his pic to go there. |
My daughter has a frame that someone made her while he was in jail. I think it is most beautiful and quite inventive, considering it is all gum wrappers.
Gum wrapper art is not just Jail house fare any more though.
Oh wow, gum wrapper wear has become ultra chic and very cool. I love this Tootsie roll bag from Nahui Ollin. You have got to check this out. These bags are nice, very nice.
The detailing and finishing on them is wonderful and they are quirky, I like quirky.
 |
| Photo courtesy of Nahui Ollin |
I mean seriously folks, this is a nice bag! And way to recycle kids.
Here is the Junior Mint line, I wonder if it is minty fresh too?
 |
| Photo courtesy of Nahui Ollin |
http://www.ehow.com/how_5187867_make-crafts-gum-candy-wrappers.html
Tuesday, October 19, 2010
From Plain to Fabulous- a step by step story, part 1

I have had these for a long time; I was going to do something with them but never did.
That is the opening to this post http://mariesegal.blogspot.com/2010/09/from-plain-to-fabulous.html
where I briefly tell how to make the heart boxes and turn them into gifts, storage, or wish boxes (God boxes).
I thought it would be nice to have a step by step to follow. So I made and photographed the step by steps for you to see how I did it.
You will need:
Cernit black
Paper mache heart boxes
Crafter’s pick “Ultimate” glue
Pearl-ex pigments I used sparkle gold, brilliant gold, spring green, silver and rose gold
Lumiere paint in True gold
Flower/leaves cutter set
Clay Machine
Plastic Handle Scalpel-SCP
Clay Slicing Blade SB
small piece of copper screen
Plumeria Border Rubber Stamp from Rubber Stamp Plantation
Condition the black Cernit until it is smooth and pliable. Cernit works best when conditioned by hand. Flattened with the fingers or pancaked and then run through the clay machine.
Roll the flattened Cernit through the thickest setting on the clay machine.

 Place some of the ultimate glue on the cut out heart.


It is best if you press it down well and make sure you press everywhere. If there is a place that you have not pressed it down it might bubble up there.
I made and used a "Believe" word mold, you can find the instructions here. http://mariesegal.blogspot.com/2008/09/making-word-molds.html I also found some larger letters that are just wonderful and used them here. They are made by De Boles and can be found in good health food stores.


Stay tuned for Part 2...
http://mariesegal.blogspot.com/2010/10/from-plain-to-fabulous-step-by-step_23.html
Monday, October 18, 2010
Monday Updates- Happy Monday
Happy Monday to you all.
Welcome to all my new followers. Blessings all over you all.
I am honored to have you here.
Congratulations to the Rune set winner Silver Moon!
Thank you Mrs. B for a fabulous 31 days of Halloween so far!
If any of you haven't been there yet, her link is on the right of my blog.
I have to take Madi to the Doctors today, well baby stuff. So no post!
I will be back soon though.
Have a wonderful Monday all of you, enjoy the fall... or the spring if you are on the south side of the equator.
It has been chilly and drizzly here. So nice though and wet.
Probably be 90 in December. LOL!
 Tomorrow I pick the winner for the bat necklace. If you haven't entered yet, enter here.
http://mariesegal.blogspot.com/2010/10/mrs-b-is-having-giveaway-and-one-of.html
Comment on that post!
I got featured in a couple new Treasuries if you would like to check it out.
Check out all the ghostly goodies and my newest snapshot bead.
http://www.etsy.com/treasury/4cbb52c0dad56d919657c6fa/boo-who
and
Some Slightly spooky goodies
http://www.etsy.com/treasury/4cb8d9ed56068eef7fac3d6b/slightly-spooky-but-very-sweet?index=1
And this orange and black beauty
http://www.etsy.com/treasury/4cbc4d3656068eef5482e66b/halloween-are-you-ready
And another Treasury of the sacred
http://www.etsy.com/treasury/4cbdf464b2926d91badb9e78/sacred
TTFN my pretties,
Marie
Welcome to all my new followers. Blessings all over you all.
I am honored to have you here.
Congratulations to the Rune set winner Silver Moon!
Thank you Mrs. B for a fabulous 31 days of Halloween so far!
If any of you haven't been there yet, her link is on the right of my blog.
I have to take Madi to the Doctors today, well baby stuff. So no post!
I will be back soon though.
Have a wonderful Monday all of you, enjoy the fall... or the spring if you are on the south side of the equator.
It has been chilly and drizzly here. So nice though and wet.
Probably be 90 in December. LOL!

http://mariesegal.blogspot.com/2010/10/mrs-b-is-having-giveaway-and-one-of.html
Comment on that post!
I got featured in a couple new Treasuries if you would like to check it out.
Check out all the ghostly goodies and my newest snapshot bead.
http://www.etsy.com/treasury/4cbb52c0dad56d919657c6fa/boo-who
and
Some Slightly spooky goodies
http://www.etsy.com/treasury/4cb8d9ed56068eef7fac3d6b/slightly-spooky-but-very-sweet?index=1
And this orange and black beauty
http://www.etsy.com/treasury/4cbc4d3656068eef5482e66b/halloween-are-you-ready
And another Treasury of the sacred
http://www.etsy.com/treasury/4cbdf464b2926d91badb9e78/sacred
TTFN my pretties,
Marie
Subscribe to:
Posts (Atom)