Tuesday, June 30, 2009

Another coming together and creating- Bobbi Ann Cook


I love it so much when I give some one something and they take it , do all the work, and make it so much better than it was before.

My dear friend Bobbi Ann Cook is a sweetie I met on bead-space.

Here is her Bead-Space profile. She is selling beautiful amulet bags there for almost nothing. Check it out http://bead-space.com/bobbianncook


She is a giving and caring woman and a jewel in my life, and I thought this is before she did this!


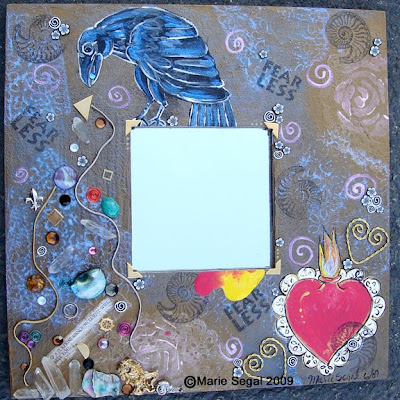
She took this little bead and turned it in to a beautiful focal piece on a work of love and art.

The bead color is achieved by putting a thin layer of Baja blue Pinata ink over Pearl White Cernit. Then it is stamped with a rubber stamp and Gold Pearl-ex ink. I add the cap embellishments in Champagne Cernit, Bake and antique with Ne-Opaque brown.

Howard carries all of those products: http://www.clayfactory.net/

It frames the bead nicely and is fashioned after medicine and amulet pouches, which I absolutely adore.


Ancient peoples used to put their little treasures and magic pieces in them and carry them around their necks and close to their hearts. We could all use a little good JU-JU, eh?


She also made this beautiful hanging crystal for Madi when she was born!!


Bobbi is carrying on a tradition in her family and honoring her mother in her beadworks.

Do yourself a favor and go visit her and her gallery of work on Bead-space.

http://bead-space.com/bobbianncook

Bobbi also has a blog now!! Congrats Bobbi, welcome to blogland!

http://bobbianncook.blogspot.com/

Monday, June 29, 2009

Premio Meme Award


I have been awarded the Premio Meme Award by Creative Treasures by Donna,
Thank you so much Donna, I love this.
You can visit Donna here http://ctbydonna.blogspot.com/

She has some absolutely gorgeous jewelry and a beautiful blog to boot.

What the hell does "to boot" or "ta boot" mean? LOL! something to do in my spare time eh? Look that up. NOT! (I probably will now that I wrote it here)
I am going to tell you now 7 facts about myself (the rules) ;-O
1. I love my grand daughter and grand son.
2. I am so grateful to be able to do what I love.
3. I am so grateful for all my pretties, thank you! (everything I do here I do for you! and me!!! LOL!!)
4. My office and Craft area are totally in disarray. (looks like a sh-t storm hit the place) now doesn't that make you all feel better?
5. I can find everything.
6. I don't dye my hair anymore.
7. I used to work in a power plant. (and my nickname on my hard hat was cannonball) make up your own stories here. If they are good, tell me, I will use them. Lol!

And 7 people I would love to pass this to! (the rules) ;-O
I understand life and know that some of you may not have time to take this and post it and follow the rules, but I just wanted you to know that I listen, I read, and I care. You are important bloggers to me.


Here is a description of the award and some of the meaning.
From K-squared Ramblings http://www.hyperborea.org/journal/

"There are at least two different descriptions of the award in English:
This award acknowledges the values that every blogger shows in his or her effort to transmit cultural, ethical, literary, and personal values every day.
and
The PREMIO DARDO is designed to recognize unique voices and visions on the Web as well as to promote fraternization amongst bloggers of all sorts.
The number of blogs you’re expected to pass along the award to is variously given as 5, 10, 12, and 15."
NICE!

Another Liberty

I was enamored of this guys murals and wanted to share, his name is Eric Grohe.
You can visit him here,


This is the wall before.
Beautifying America through art!!

Saturday, June 27, 2009

my grandma says...


Oh my!! My grandma says there are only a few more days on her necklace giveaway.
You might just want to get your name in there before it ends.

4 x 6's- Sacred Heart


Black Tee-Juice fabric marker for outline, Lumiere acrylic paints, and regular acrylics.

Friday, June 26, 2009

The other Mirror

I made a mold set quite a while ago called Etruscan, it was one of my favorites. It was discontinued rather quickly because the big retail stores didn't pick it up. The numbers were low, in the trash it goes. Some one requested the mold, there are no more, so I remade the pieces for them. I test the molds before sending them out so I added the pieces to this frame in gold Cernit with the interference powders on it: Blue, Red, and Violet Interference Pearl-ex, baked them and then antiqued with Pewter Lumiere.


The frame was quite plain before but I like it a lot now.


Here are the instructions for painting the mirror.
http://mariesegal.blogspot.com/2009/06/paint-mirror-quick-and-easy.html


See what happened to the other one here.
http://mariesegal.blogspot.com/2009/06/raven-vomiting-diamonds.html

Tuesday, June 23, 2009

Lady Liberty


"Statue of Liberty Liberty Enlightening the World", which is the full title of Bartholdi's work was fashioned in the style of Greco-Roman art.

I love the Statue of Liberty. Really, how can I not fall in love with 60,000 pounds of repousse patina copper?

Not only is it a monumental work of art, it is a symbol of America, of freedom, and of potential.

I got to see the lady in 1997. I did not want to see it the tourist way. I wanted to feel it.


I first saw it from across the water at night. In a way similar to the way my family would have seen it coming in to the harbor. After weeks of traveling on the water.
I tried to imagine what they would have felt, the smell of the air, and the freedom of land. They had made it.


Photo September 18, en:2006 by Nightscream

Would they have almost forgotten why the hell they did this in the first place? Then, to see her there in all her glory. Emotional... yes!


I wonder if after they got here, if it was truly worth the journey, the hardship, and the heartache?
My hat is off to you Giuseppe, this is big!

Monday, June 22, 2009

4 x 6's -Through the Night


verse from tut.com

4 x 6's- Liberty Lady 2


4 x 6's- Liberty Lady


Raven vomiting Diamonds


Beau Dick, Kwagiulth
Hands of Creation 1990
"The raven is a symbol of creation for my people. The raven's wings are depicted as hands. The stream of abalone that flows from the raven's beak represents the seeds of creativity."
http://www.nativenorthwest.com/


How perfect is that?


I know it sounds silly, but it moved me. This is before I saw the card and read it. Sometimes you just gotta fly by the seat of your pants.
Purest Green at "where there are no chickadees" is having an unusual giveaway. It is called the postcard project. Right side of her blog, if you want to take a chance.
You can read about it here
and here
and here

I signed up. I was enticed by what she called "raven vomiting diamonds". I know, weird thing to be enticed by, but I love ravens and if they are regurgitating diamonds it can not be a bad thing.


And then I forgot about it.


A week later I got the card you see at the top. There was no description when I signed up, only her words, "Raven vomiting diamonds". I love the card, it is a Canadian card, sent from Scotland, to the USA. With a cute note to me from Purest Green. How cool is that? And my world is way bigger.

Well, I am a visual person, when others are talking I get visuals like a movie screen in my head that spits out images. Some times this is good and as you can imagine, some times it is very interesting. I really don't think about it much, it just is and always has been.

This time it was good.


You know that frame I told you how to paint. Well... this is what happened to one of them.
Read about it and the instructions here
http://mariesegal.blogspot.com/2009/06/paint-mirror-quick-and-easy.html
And if I tell you to "stop, I am getting a visual", you will know it is probably interesting.


Tah-dah "Raven vomiting all kinds of things"

Sunday, June 21, 2009

Happy Father's Day

This is for all the fathers, biological or spiritual!! Thank you!!
And especially to my dad and my husband, who are wonderful fathers. They showed up and were present. They brought their whole self to the job. Well done you guys!
This family is forever better because of that.


I found this pic of Howard and his girls. This is why I love him.
1983

Saturday, June 20, 2009

Summer Solstice- part 2


For the runes stones above you will need:
Pinata inks
Cernit porcelain white 2 ounce block
Clay Blade
Pasta machine
Ne-Opaque White
Rune Stamp 246-001k- http://www.eragraphic.com/
Glass Gems Clear- got mine at the local craft store, 3$ a bag
Decorative bag to hold them- local craft store
Here is the other link for how to color the clay
http://mariesegal.blogspot.com/2009/06/lapis-lazuli.html

All of the supplies in bold print can be found in my husband's store Clay Factory
http://www.clayfactory.net/


After the clay is colored. Condition and roll out the colors in the pasta machine on the 5th thickest setting.


Cover the glass tablet and pinch the edges of the clay down.


Fold the other end of the clay over the glass stone. Trim away the excess so the seam on top matches. Pinch the clay together and smooth.


Smooth all of the seams and roll very gently in your palms to smooth.
Lay the rounded side of the stone down on the rune you want to stamp and roll it a little from side to side to imprint the rune.

You may have marks from the rune next to the one you impressed on the stone, you can smooth that away with your finger.
Lay on your baking cardboard and bake in a pre-heated 275F degree oven for 30 minutes, shut off oven and let cool.
Antique with the Ne-Opaque white.
You can find that at this post.
http://mariesegal.blogspot.com/2008/10/lumiere-as-antiquing-medium.html

craft & a cocktail (with the craft whore) celebrates summer solstice with special guest ALICIA BRANDT
http://www.youtube.com/watch?v=V8R7FE_0cMs
Disclaimer: there is some language in this, so if you tend to be offended, don't watch.

Summer Solstice- Rune tiles and beads


Summer solstice the longest day of the year

Awed by the great power of the sun, civilizations in the northern areas have for centuries celebrated the first day of summer otherwise known as the Summer Solstice, Midsummer (see Shakespeare), St. John's Day, or the Wiccan Litha.


I love Runes. I like the way they feel and look and it brings me back to an ancient time.

I like pieces of polymer clay that look like they have been dug out of the ground or are replicas of a time gone way by. My pieces have been a reflection of that. I used to call my creations "Ancient Myth with a Modern twist".

These do have the modern twist.

I love letters and words also so this is just the ticket for me. If you have noticed I have been focusing on Pinata inks and this is a continuation of that too.

I also LOVE this lady's stamps. ERA Graphics
She has a rune stamp 246-001k
here is the link to her site, http://www.eragraphics.com/

Please tell Roberta I sent you. She is a talented artist and a nice woman trying to make her way in the world, just like me and I am sure, also a few of you!
It is also an Angel stamp company.
You can get stamps unmounted.


You will need:
Porcelain White Cernit
Pinata inks of your choice
5/8" round cutter
Lumiere or Ne-Opaque acrylic in the color/colors of your choice
Rune Stamp 246-001k from ERA Graphics

Products in Bold print are available from Clay Factory http://www.clayfactory.net/
1. Color your white clay with the ink.
as a matter of fact I am going to use some of the Lapis Lazuli to make some of the runes.


When your clay is colored with ink to the shade that you like, remember they will darken after baking so 3- 5 drops is great for most colors, but I probably used 15 for the Lapis Lazuli,

2. Roll out your clay on the thickest setting in your pasta machine and double the sheet to get a thicker sheet or roll out by hand to about 1/4" thick.

3. Cut out round shapes.
4. Roll into little barrels.
5. Cut the stamp into rows of Runes this way.
6. Press the little barrels on to the rune. You are pressing to make the impression not flatten so use a gentle hand.


If you get a little heavy of hand, recondition the clay and do it again or press gently with you fingers on the sides to push back in to a square shape. You can "drill" the holes with needle or needle tool before they are baked or drill with a small bit after they are baked and cooled.

7. Line up on a piece of cardboard and bake in a 275F degree pre-heated oven for 30 minutes. Shut off the oven and let cool.
After they are cool antique with the Lumiere or Ne-opaque
Here is how to antique your baked pieces. You can see the results of the different colors of Lumiere and Ne-Opaque above.

If you like heavier runes you can cover small light colored river stones or glass pebbles with the Pinata colored clay and stamp, bake, and finish by antiquing. Coming next post.

Friday, June 19, 2009

2nd Giveaway

Well, it is time for the 2nd giveaway. This is part of a pay it forward and backward scheme of mine to celebrate all kinds of milestones and gratefulness. You can read about it at the first post here.
And the winning post here.

This is a piece I have made specifically to giveaway.

I am going to call it Bella. It is beautiful to me, like the person I named it after.

It is entirely hand constructed by me with copper wire and Cernit beads. The black long tube beads you see are Cernit also. The flowers are too.


It has a handmade signature bead on the eye side of the clasp that says Segal and that is Cernit too.
The necklace is one of a kind. Just like the person I named it after.

To win this beauty you will have to comment on the post. Maybe I should make you all do tricks. Naw!
Just comment.
This giveaway will end on the 3rd of July at 6 pm PDT. I am not staying up till midnight. The night I set it for midnight, I wanted to go to bed early.
PS. I will be deleting duplicate commenters as I go so it is a little easier for me. I still love you!

Thursday, June 18, 2009

A delightful award! An Award of Light

Jodi Creager from Creager Studios has bestowed upon me a most delightful award.
Thank you so much Jodi. I am thrilled with this award, and your kind, kind words. It has been a interesting couple of three weeks and I am feeling pummeled and spent.

It was my sign.


My blog inspires and illuminates, wow. I am all verklempt! Please... talk amongst yourselves for a moment.

English translation "this blog and the best alternative for light"


I could have picked so many more, but today
I am passing this to


Renee at
http://www.circlingmyhead.blogspot.com/
because she inspires and illuminates others and me everyday with her light, realness, love, and awareness.


Ces at
http://www.cesandherdishes.blogspot.com/
because she is light, inspiration, and muse to many including me with her frankness, love, and abundant talent.


Bella at
http://bellasinclair.blogspot.com/
because she is a light, love, and inspiration in many people's eyes and mine, also a talented, brave, and accomplished woman and muse.


Susan at
http://www.susanrichardsmultiplevisionsstudio.blogspot.com/
because she is kind, talented, and searching for light in her life and is in turn a light and inspiration to me.


Purestgreen at
http://underthetonguerecipes.blogspot.com/ or Where there are no chickadees
because she is kind, funny, illuminates, and inspires me everytime I visit her.

Wednesday, June 17, 2009

American Hearts


I thought this would be good to have up before July 4th so you could work on it!
Here is another project from the Hearts of Dimension series. Here is the first one and the first one is the basic instructions, so you will need this link ttp://mariesegal.blogspot.com/2009/02/happy-valentines-day.html


All of the products in the bold print you can get from my husband's on line store, Clay Factory.
http://www.clayfactory.net/ and thank you for shopping at the Clay Factory!
Cernit
Opaque White- 029
Christmas Red- 036
Blue- 017
Gold- 122
Makin’s Clay Heart set
- 35011
Needle tool- RNT or ABUG
5/16” star cutter
Clay Blade- AKTBLA
Clay Machine- 35054
Eye hooks
10 mm posts and backs
Cyanoacrylate glue


1. Condition and roll out on the thickest setting in the clay machine a 1” ball of opaque white clay.
Condition and roll out on the thickest setting in the clay machine a 1” ball of red clay.
Cut the white clay so you have a strip that is 1” x 2” long.
Cut a strip of red the same size as the white.
Lay the red clay on top of the white clay so the edges line up.


2. Cut 4- 1/8” slices of the stacked colors; stack one on top of the other. Or... you can cut 1/8”slice and drag the blade towards yourself to attach the slice to the blade and place the slice and the blade a top the stack to measure and cut the next slice.


Keep cutting and bringing towards yourself to stick the slices to the blade until you have 4 sets.


3. Make two of those 4 slice stacks, turn one around horizontally 180 degrees and stack one on top of the other.


4. Cut the stack in half.


5. Rotate one of the slabs horizontally 180 degrees and stack on top of the other.
Line up the lines so everything matches and then compact the cane to attach all of the slices. One at a time press on the lined side and then rotate stack ¼ turn and press that lined side, keep rotating and pressing all 4 lined sides to compact all of the squares together. Do not press to change the size, just to compact.


6. Slice off a 1/8” slice of the checkerboard cane and roll through the clay machine on the thickest setting. Rotate the slice ¼ turn and turn down the setting on the clay machine to the 2nd thickest setting and roll the slice through again. Roll the slice through the clay machine on the 3rd thickest setting the same direction as the step above with out rotating the slice.


7. Condition and roll out blue clay in the clay machine on the thickest setting.
8. Cut out 2 hearts using the medium cutter from the heart set.

9. Cut out 2 of the small hearts out of the checkerboard pattern and place on top of the blue cut out hearts. Press these gently in to place with out smashing.

10. Follow steps 4 and 5 in the valentine sweethearts instructions to add the marks and make the dots around the outside of the Blue heart.

11. Condition and roll out some gold clay on the 5th thickest setting in the clay machine and cut out a gold star with the 5/16” cutter and place it in the middle of the small heart at the top. Press gently in to place and do the same steps to the other blue heart. Refer to finished hearts on at the top of the page for placement.
12. Bake according to steps 9 and 10 in valentine sweethearts.
13. Glue on earring backs and let dry completely.
I bet you can come up with other things to do with that left over checkerboard too!