

I meant to get this posted before the end of the year! Sorry, but it seems to be a great start for the new year. You may want to choose colors that are a little less holiday looking!
Jazzy Glass Beads
Marie Segal 2008
Marie Segal 2008

Do you have some plain glass beads that could use a make-over? I have lots of glass beads and I thought why not take some of them and make them different from what they are? One way to do that is too stamp them with Gold pearl ex ink!
I used some,
Rubber stamps, mostly for the texture, not as much for the image
Pearl-ex inks- gold
Glass Beads- Flats and cylinders are easier to stamp
Bamboo skewers or needle tool- different sizes
Heat gun
Baking card board- using a box top cut from a corrugated box is great
My Home Oven- to bake the beads to completely cure the ink
Rubbing Alcohol
Old towel or toweling
Here is a pdf file for the care and feeding of the Pearl-ex stamp pads
the link under the gold bottle of ink on the right side of the page is from the company that makes the inks and pads and the link to the right of that that says “How to use and care for these inks and ink pads” is from me and a lot more detailed with some fun instructions in there.
Clean the glass beads with the towel and alcohol and let them dry
Place the ink up the stamp with the ink pad.
 Place the bead on the needle tool or skewer.
I used the needle tool for this one because the handle is metal and less likely to break when I press it down on the stamp for this long bead.
Stamp one side then the other and then the other sides. You can heat each side of the bead with a heat gun before you stamp the next side, but keep the heat gun moving or you might crack the glass by leaving it in one place too long. No, I did not do this, but the beads do get very hot. Do not stamp the next side of the bead until the bead cools down. I do two sides of the bead and quickly heat set, do the other sides, heat set until ink is not tacky and set on cardboard to wait until I am done stamping all of my beads.

For the cylinder beads I place them on a skewer and roll the skewer and the bead gently up the inked area.
 Here you can see what it looks like when done. I find that too skinny of lines in the stamp are not as nice as the bolder stamps like the one shown (ERA Graphics stamp)
 Here you can see what it looks like when done. I find that too skinny of lines in the stamp are not as nice as the bolder stamps like the one shown (ERA Graphics stamp)
Here is a bead I placed on the needle tool and rolled up the inked area, You can place you finger on the needle on the other side and hold the bead down that way and still roll the needle up the stamp. Also placing the stamp on the folded toweling helps the stamp to conform to the bead shape while stamping. Go slow, the ink will tend to slip on the bead, you can just wipe it off if this does happen and the image blurs.
When all the beads are stamped and heat set until not tacky, you can place them on the baking cardboard and bake in a 275 degree preheated oven for 20 minutes. Shut off the oven and let cool in the oven.
String your jazzy beads just like regular glass beads and enjoy.
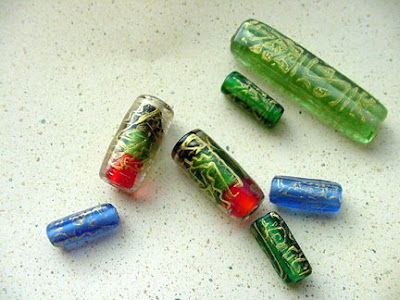
I think that the darker the glass on the bead the better these look. JMHO!
No comments:
Post a Comment
I am so glad you stopped by. Please leave your words of wisdom. I look forward to them and I so enjoy reading them all.
Live to love, Love to create, and create to connect.
Marie
www.mariesegal.com
www.clayfactory.net