Wednesday, December 31, 2008

Happy New Year


Happy New Year,

I know that some of you don’t celebrate this holiday when I do, but my intentions for you are all the same, may my new year bring you all of the best you have ever had and more than you can ever imagine!!
To the infinite possibilities in 2009!!!
Blessings all over each and every one of you!
Marie

Tuesday, December 23, 2008

Polymer Clay Collaborative and Mixed-Media Retreat


Attention Polymer Clay and Mixed Media Artists!
Polymer Clay Collaborative
… and Mixed-Media Retreat
June 1-6, 2009

On the campus of Shepherd University in Shepherdstown, West Virginia, polymer clay artists will be able to collaborate with artists of other mediums. If you work in Polymer clay, precious metal clay, paper arts, collage, book arts, fiber, paint, beading, stamping, or all of the above, this retreat is for you! Get a group of your friends together and join us at Shepherd University in the quaint village of Shepherdstown.

Registration is open NOW until April 1, 2009!

For more information and registration, visit our website:
http://www.pccmmretreat.com/

Sunday, December 21, 2008

Another Project


Pinata Ink Flowers and Leaves, here is another project someplace else. This is a good one if you just want to try one color of clay, you know test drive it, and have Pinata inks already (if not Howard carries them, pinatas and porcelain white Cernit). The flowers and leaves are completely colored with the inks. The color that I am using is the porcelain White or the regular white, the one that is a sort of frosted glass type clay in look. You can also do this with the opaque white Cernit for a completely different look!


The Pinata inks are a wonderful product to add to any artist's tool chest, because they can be used on almost anything. I am though careful when using them on something that alcohol is solvent to. I have great luck with metals, glass, polymer clay, some plastics, and fabrics. They are translucent, so color shows through them, especially on the lighter colors.


With Cernit clay they can be added and layered or added to the surface for coloration of the clay.


As in these Inkling Beads, this is a pay for project that can be found at

Holiday wishes


I hope that no matter how you spend this time, that you spend it with friends and family or friends that are family, that you are warm and you are dry, you have food to eat, and love in your heart. That is my wish for all of you who stop here. May this year coming, 2009, bring you all you could ever want and more that you could ever imagine. I am so grateful for all of you!!!


And... may you never get caught with your pants down!!!

Friday, December 19, 2008

Project Sheet


I am so sorry about not posting sooner, life got in my way and when I can get clear on what has happened I will post about it, or not. If I don’t have to repeat last week, it is a very good thing. But… it would make a great comedy skit; you just can’t make this stuff up.
The holidays are coming (gee, ya think?) and I am backed way up, with no money (like that is new for anybody). So that means I have to make something, I need to do that. So I am going to take the easy way out here and post some stuff that I have on another site that is new!
I have two new projects up on the Jacquard website; the first one is the silverware with the Granite Cernit that I showed here. There are step by step instructions and pictures for you!!! If you need a last minute but totally heartfelt and individual gift, this just may fit the bill.
Easy Stone-like Silverware
https://www.jacquardproducts.com/easy-stone-silverware.html

This is a very easy project so you will just have enough time to get this done!!

I'll post the other later.

Blessings all over all you all.


Wednesday, December 3, 2008

Extruder Canes with Bead Patterns as a guide

I put up the color mixing chart yesterday for this project!


Millefiori is the glass technique of bundling or layering colored rods of glass together to form images and then cutting the cross section of the bundled or layered glass to get a little tile of an image. These colored rods of glass are called canes. I have seen this technique duplicated in many mediums, ceramic, candy, food, and polymer clay, and it can sometimes seem almost impossible to achieve, but if you start with basic design, bulls eye canes, open spirals and checkerboards just to name a few, you can combine those to make more intricate pictures or images, called advanced caning. Anytime two or more simple patterns are combined it becomes advanced. I have found a way to make intricate canes that is so easy to do, yet gives the impression of intricacy and complication. Bead patterns and a Makin’s Clay extruder are great for attempting this.

You will need:
Red and orange Cernit, 2 blocks of each
Opaque white Cernit, 1 block
Makin’s clay extruder
Kemper Slicing blade
Bead Pattern- I got mine on http://www.bead-space.com/ from Kris Jernberg who is BeadedandBejeweled on Bead-space. She has her many beautiful patterns in her gallery and generously shares them with all of us at Bead-space. Thank you so much Kris, this project is 10 times what it normally is because of your generosity and talent. This is her home page at bead-space http://www.bead-space.com/BeadedAndBejeweled. Any bead patterns or your own can be converted to canes this way. Even some cross stitch and needle point patterns work great for this also.
I love bead-space and Kris is just one of the many reasons I am so proud to be a part of this community of generous, kind, and talented men and women.

Mix each Red block of clay with 1/8 block of Opaque white
Mix each Orange block of clay with 1/8 block of Opaque white

(You can do this with the colors that Kris picked too, use 2 blocks of Yellow and 2 blocks of Light Green and mix those with 1/8 block of Opaque white for each block of color.) In my picture block the Green color is orange clay and the yellow color is red clay. I cross out the line of squares on the pattern as I complete them so I don't get lost.
Load up the extruder with the conditioned red mixture first by rolling into a coil slightly smaller than the barrel of the extruder and use the square disk that comes with the extruder. Place the disk in the end fitting and screw that on to the end of the barrel and screw the handle down to extrude the red clay in a square shape. Cut this long tube of squares in to 2 “sections.
Then extrude the other glob of preconditioned red clay.
Now do the Orange clay blobs and cut those extruded squares in to 2” lengths.
Now you are going to use sticky notes and block off a section of the pattern like I have done, shown in the first picture above. Now assemble the squares to duplicate this pattern exactly. Place all the square logs together deliberately and take your time to make sure they are all lined up. Once you get the block together. Start compacting the lined sides (all of them one at a time) of the block down gently to extend the patterned faces out and lengthen the design block and make it smaller in size. Go slow and do a little at a time to keep the rectangle shape and the pattern straight.
Once you get this down to about 1” on one side you can cut in to sections and put them together to form different patterns. These can be put together a multitude of ways and in many configurations, just play around with them, just don't press them together until you get what you like. Then they can be pressed together and reduced again and cut and placed together again to make the design more and more complicated.

Tuesday, December 2, 2008

Making porcelain Cernit colors opaque


I have talked about keeping the Cernit colors porcelain like and looking more like the color you see right out of the package. Now I am going to tackle the method of making the color more Opaque and looking like the raw color out of the package.


We all have to knead our clay no matter what brand or softness to get the best results, this will redistribute the particles evenly throughout the block of clay. I showed you an example of the non-kneaded Cernit here. Clay will settle like a box of cereal will or like the oil in peanut butter will rise to the top when sitting on the shelf. Mixing in additional colors during this process is really no different than kneading your clay up as straight out of the package and not adding color. This color formulation works out to be 1 block (2.2 ounces) of color to 1/8 or 1/16 block of the Opaque white Cernit (029) to make it more opaque and keep it closer to the package color even after the darkening of the baking process. Depending on how much I want it to be opaque, I find that the 1/8 block of Opaque white (029) is the best for millefiori or caning purposes. Even more opaque white than this can be added (maybe 1/6th of a block of Opaque white), it is up to you and it gives another shade of the same color to work with. I keep these formulations pretty basic so that I can easily duplicate the color again if I need it. This is where you would want to make a test chip and write it down in your color journal. To me it is of value to document my progress and process so I can see how far I have come and what I have learned.
With the changes in Polymer Clays by removing the Phthalates, we are going to be dealing with a different animal whether we want to or not, and instead of mourning the loss of what used to be, I am working on dealing with what is, moving on, and how to make it work for me. I am grateful for the chance to be excited again. I am also grateful for the changes that I see in my work and the pieces I love to create.


Monday, December 1, 2008

Cloisonne Jewelry


These necklaces are what came from the Cloisonne beads and the extruder beads I made. Notice that I didn't cut the extruder beads in small sections I made these an inch or longer and because the clay is flexible, I can make large hoop earrings like these shown on the top left. The necklace here is strung on 20 gauge Non Tarnish Brass wire and I make a hook on one end and an eye on the other.

Thursday, November 27, 2008

Happy Thanksgiving

Life is interesting and we live in interesting times. But this American Holiday reminds me that I am grateful for my family and friends, my creativity, my art, my home, and my business and to be able to make it through some very trying times with all of these things still intact, different, but still intact and even better than before. I am grateful for that, so grateful and I am grateful for all of you and your friendship. Thanksgiving should be everyday, Blessings all over you all,

Love is all there is.

Marie


Try a little of what has been a thanksgiving holiday event for my family for many years as we made our way through horrible traffic to stuff our face.

Alice's Restaurant

Sunday, November 23, 2008

Tinting Granite


Tinting Granite... sounds like a new band name!!


Granite Cernit is wonderful color of clay and it can be tinted to so many different colors. All of the Nature colors are fabulous dahling, but Granite is sublime.


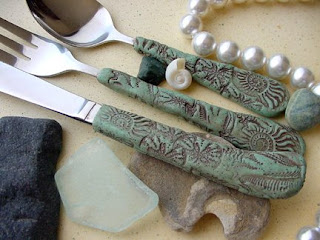
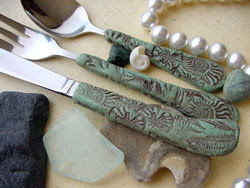
Here is the Basalt and because it is green, it is naturally a favorite of mine.

Cernit is a wonderful clay to make silverware with because of the hard and dense surface after baking. I also used Black Ne-opaque acrylic paint as an "antiquing medium" for the top handle in granite and Brown for the handles in Basalt color.


Rubber stamps courtesy of http://www.rubberstampplantation.com/ Thanks Deb!!!

And for what is so cool about the color Granite...

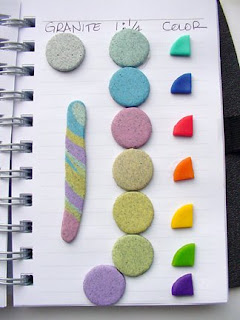
One clay, oh so many choices!!! There are just 7 here. The possibilities are infinite. This formulation is 1 part Granite and 1/4 part color Cernit of choice. These colors remind me of that wonderful 50's floor tile.

Because of the nature of the Nature colors, they are better for this type of application. For caning, layered stacks, mokume gane, and millefiori techniques you are better off starting with the Opaque white and mixing in embossing powders for that. Anytime you are cutting cross sections of the clay, the fibers and particles in the Nature colors will load up on the blade and sometimes drag across the surface or face of the image. Opaque white Cernit with black, gray, and gold embossing powder will give you a similar look. Some places even have Granite embossing powder with a varied mix of powders sold as the color. You can tint that too!!! OMG!!! I love oven-bake polymer clay!

Do you have some crummy silverware that needs a face lift? Wouldn't this make a wonderful gift? Bought my silverware at Smart and Final.

Saturday, November 22, 2008

Another extruder trick- making rope

As long as I am on the extruder thing, I thought I would post this. You can use this for twisted beads using the bead corers if you want, but I am just going to show how to make a rope the easy way.

Mix up and condition your color choice of clay. I am using the violet Cernit mixed 1:1 with the
porcelain white Cernit, 1. because I had it left over from the cloisonne beads I made before and 2. because the violet color of Cernit is so wonderfully beautiful.
Roll out a little coil or plug of clay that is about 2 1/2" long and slightly smaller in diameter than the inside diameter of the Makin's Clay Extruder barrel. You will also need the cloverleaf disk that comes with the Clay Extruder.
Put the disk in to the end cap and the clay in to the barrel, put the end cap and disk on the end of the clay extruder and screw it on.
Screw down the handle of the extruder until the clay starts coming out the end of the extruder, continue until you have extruded all of the clay out of the gun. It does about 12". Cut in to 4" pieces for easier control and to practice with. Hold one end of the extruded cloverleaf and with your other hand and roll the other end gently away from you. This will twist up the cloverleaf and you will have a rope just like that.


You can use these for all kinds of things, beads, like I said before or making into shapes. I am sure there are tons of other things you can come up with using this rope.

Here is a heart I made out of this rope.


Also you can use it to wrap around cut out shapes. When I used to make custom wedding couples many years ago they would stand on a large cut out heart and I would wrap this rope coil around the heart to camouflage the cut edges...and besides that it looked very cool. I love those 2 birds, one stone things.


So if you condition your clay and roll it out on the thickest setting in your pasta machine or about an 1/8" thick and fold the clay in half to double the thickness, then you can cut out a shape with a cutter. The cutter I am using here is a 1" round Kemper cutter, yes, you heard me right they make them now. Sometimes Howard needs to be booted in the pants to get him load things up on the website, so you just write him at order(at)clayfactory.net and tell him you would love to have one of those 1" round kemper cutters. Substitute that word (at) for the sign. Tell him Marie sent you.
Once you have the shape, then you take the rope and place it around the shape. Cut the leading edge of the rope with your clay blade for straight edge first.

Wrap completely around the shape and the end of the coil will overlap the beginning end of the coil. Cut off the outside one there and butt the edges together, I used to do this on the hearts and begin and end the rope in between the lobes of the heart.
I hope you all are have a GREAT weekend.

Friday, November 21, 2008

Extruder beads


I am going to use this ochre color Cernit formulation again, I have some left over from making the beads and it will match the beads that I have already made. Yes, I do have a plan for these. Stay tuned.


You will need a Makin's professional extruder and the Bead core adapters in the small set and one of the small round dies that come with the clay gun set. There are also two sets of 10 different dies that can be purchased extra. I am going to use the smallest bead core adapter 1mm to make these beads.


This is what that looks like with some of the disks that are available, the bead corers, and the Makin's clay extruder. You see that small arrow in the bottom left corner of the picture pointing to the bead corer disk and the disk that is in the extruder end cap, those are the ones I used for these beads. The long extruded coils in the top of the picture are the bead coils with a hole inside them baked and waiting to be sliced with the clay blade that you see right next to the green extruder. Those little beads that you see under the coils waiting to be cut are the cut beads ready to be used in a design. I can not even begin to convey how much I love this tool. With all of the disks that are available with the clay extruder, I can make all kinds of beads myself that match my clay beads and focal pieces exactly and I can also extrude clay rods to build canes with too (more on this later).


Place the disk you want to use in the fitting on the end of the gun and then put the core adapter into the hole of the disk with the rod of the adapter coming out the center of the disk as shown. Condition and soften some of the ochre clay (or clay color of your choice) until it is soft and smooth, roll into a coil about two inches long and slightly smaller than the diameter of the barrel of the clay extruder. Place the clay in to the barrel and screw on the end fitting with the disk and the core adapter in it on to the end of the barrel of the clay extruder. Now screw the handle down until the clay starts to come out the hole of the disk.

Here you can see the clay starting to come out of the hole in the disk. Continue to screw down the handle and the clay will keep coming out. Do this until all the clay is out of the gun and you can not move the handle anymore.


Here is what the end of the coil looks like with the hole in it and a coil of the bead. These can be baked now in strips as long as your baking tray or cut in to sections maybe 5" long. After they are baked and cooled you cut them into any size you want.

Wednesday, November 12, 2008

Cloisonne type beads


OK, this is what I was leading up to.


You take an 1/8 block of 7 colors of Cernit, violet, blue, light green, yellow, orange, red, and turquoise and you mix it, 1 part to 1 part, with 010 white (porcelain). Mix the clay completely till it is one color. Take a 3/4" ball of each of the colors and roll into a coil that is 3 1/2" by 1/4" in diameter.


Place a small amount of Aztec Gold Pearl-ex powder on to a paper plate and spread out the powder a little to take out the clumps and get a thin coating on the paper plate. Start with one coil and roll the coil into the thin layer of powder until it is completely covered on the outside of the coil. Spread out some more of the powder if you need to. Rub the powder in and the excess off of each coil. Now do this to all of the other colors. I place all of my powder covered coils on to a piece of typing paper.


With a clay blade cut each of the powder covered coils in half and flatten one of the halves in to a teardrop shape.


Here are all of the coils after I have covered them with Aztec Gold Pearl-ex powder. Now wash your hands really well or change gloves if you wear them. Get yourself an old towel to wipe your hands off with later too.


Now mix 1/2 block caramel Cernit with 1/2 block of yellow Cernit till it is one color. Flatten it out with your fingers and roll this out in your pasta machine on the thickest setting, fold the sheet in half to double the thickness, and cut out circles with a round 1/2" cutter. Roll the 1/2" ones into balls and set them aside. Using the 2nd cutter (middle one) from a Makin's Clay 3 piece round cutter set, cut out some of those, roll those in to balls and then roll them in to teardrops. Flatten the teardrops until they are about 1/4" thick.


Now take the little coils and slice off 1/16" to 1/8" thick slices of the colored powder covered coils with a clay blade. Put the slices on the ochre colored balls and teardrops to form images or patterns. Press the slices gently into place on the balls and teardrops. Wipe your hands every so often to take off the excess powder. I do not like to over lap the slices, but sometimes it might work out that way. But mostly it is one level of slices on the beads.


Here is a tray of beads ready to go into the oven.


You just never know, I might even make something out of these.

Tuesday, November 11, 2008

Yellow Ochre

Ochre or Ocher (pronounced /'əʊ.kə(r)/, from the Greek ὠχρός, yellow) is a color, usually described as golden-yellow or light yellow brown.
This is the definition from wikipedia
This is the mixture in Cernit.

This and the last post are also leading up to something.

Notice the "not conditioned" Caramel.


This was broken off the block flattened a little and run through the pasta machine on the thickest setting.

Because Cernit has a porcelain effect you can view what happens in all Polymer clay when it is not conditioned. ALL polymer clay should be conditioned, no matter how soft it is.

Cernit is very strong and this piece is very durable and it might even be featured in some way through someone's work, but you can not do this with all clays.

Conditioning gives you the best results possible for your clay of choice.

Saturday, November 8, 2008

Mixing with 010 or what I call the porcelain white Cernit


When you want to have the color of Cernit (the new formulation) more intense, brighter, and a little lighter after baking (they will darken quite a bit, nature of the clay and it's porcelain effect) and more like the package color that you see. I like to mix it with the 010 white. This is kind of confusing but awesome once I get adjusted to their way of thinking. The Cernit company’s clays are meant to look like porcelain clay and they have a porcelain look to them. It is very close to using a translucent clay. The more I work with this feature instead of fighting it, the better my work looks in it (imho). I will sometimes take a color, say yellow and mix it with a small amount of opaque white 029 and then leave some not mixed with anything and then mix some of the yellow one to one with the porcelain white 010, now I have 3 variations of the same color and when baked they all work together (after all, they are the same color, wonderful for those of you that think you don't know how or are afraid to mix colors), but I have a variation of the same color for a more dramatic effect, as in the flames of the goblet above. Here is another view of the yellows. I have used more than one yellow color and its variations in the flowers though.


Here is an example of a rainbow of colors mixed one to one with the porcelain white 010 or what they just call white.
It is a little hard to distinguish from this photo but you can see the darkening that takes place when you remember that I mixed them in equal parts with what they call white.
This also means that if you want to have the regular colors be opaque you will have to mix all of the colors with a little of the opaque white 029 or with this clay the lines between the colors in the image cane (even though straight and perfect) will appear to be wispy and unclear. The light plays all the way through the clay like frosted glass in this instance.
Or another way to make fabulous canes, because this new formulation of Cernit canes wonderfully well and slices oh so well, is to outline all of the colors with an opaque color or a very dark color, in this way you are isolating the colors or components of the cane which to me will stop the wispy lines, those crooked lines are made by me not the clay. I do this anyway when I cane so it seems very natural to me. The outside packing of this cane is the porcelain white 010 and Biscuit mixed together.

Tuesday, November 4, 2008

To laugh is to live...

This is what I need to remember as I grow in years. How to laugh like this, may alleviate all my fears.

Saturday, November 1, 2008

Skull Preparation


Preparing the skulls for use in my Dia de los Muertos pieces requires making the skulls, baking them and then antiquing them with Ne-opaque brown paint, it is a wonderful, creamy, smooth, light bodied acrylic paint that works fantastic with the Cernit. This is Opaque White that I am using. I use a pretty large stencil brush as you can see from the picture; the skulls are about ¾”. I dip the end of the brush into the lid of the paint jar and apply the paint to the skulls. I prefer a kind of stiff brush like this to get in to the cracks and the eye sockets. I cover all the skulls I have with paint this way, or if I have a lot, I do 10 at a time and then I take a ratty old dish towel, dampen it (key word dampen, not soak) and wipe off the excess paint. I then drill the holes in the side of the heads and wire in to my pieces.

Day of the Dead


The festivities were dedicated to the goddess Mictecacihuatl,[2] known as the "Lady of the Dead," corresponding to the modern Catrina.
In most regions of Mexico, November 1st honors deceased children and infants where as deceased adults are honored on November 2nd. This is indicated by generally referring to November 1st mainly as "Día de los Inocentes" (Day of the Innocents) but also as "Día de los Angelitos" (Day of the Little Angels) and November 2nd as "Día de los Muertos" or "Día de los Difuntos" (Day of the Dead).[3]
Beliefs

Many people believe that during the Day of the Dead, it is easier for the souls of the departed to visit the living. People will go to cemeteries to communicate with the souls of the departed, and will build private altars, containing the favorite foods and beverages, and photos and memorabilia, of the departed. The intent is to encourage visits by the souls, so that the souls will hear the prayers and the comments of the living directed to them. Celebrations can take a humorous tone, as celebrants remember funny events and anecdotes about the departed.[3]
Plans for the festival are made throughout the year, including gathering the goods to be offered to the dead. During the period of November 1 and November 2, families usually clean and decorate graves;[2] most visit the cemeteries where their loved ones are buried and decorate their graves with ofrendas, or offerings, which often include orange marigolds called "cempasúchitl" (originally named cempoalxochitl, Nahuatl for "twenty (i.e., many) flowers"). In modern Mexico this name is often replaced with the term "Flor de Muerto" ("Flower of the Dead"). These flowers are thought to attract souls of the dead to the offerings.
Toys are brought for dead children (los angelitos, or little angels), and bottles of tequila, mezcal, pulque or atole for adults. Families will also offer trinkets or the deceased's favorite candies on the grave. Ofrendas are also put in homes, usually with foods such as candied pumpkin, pan de muerto ("bread of the dead") or sugar skulls and beverages such as atole. The ofrendas are left out in the homes as a welcoming gesture for the deceased.[2] Some people believe the spirits of the dead eat the "spiritual essence" of the ofrenda food, so even though the celebrators eat the food after the festivities, they believe it lacks nutritional value. Pillows and blankets are left out so that the deceased can rest after their long journey. In some parts of Mexico, such as the towns of Mixquic, Pátzcuaro and Janitzio, people spend all night beside the graves of their relatives.
More of this holiday...
http://en.wikipedia.org/wiki/Day_of_the_Dead

Thursday, October 30, 2008

Witches, ghosts, and scary things…


OK, I told you I love this time of year, I told you I love Halloween, and I love what goes with this time of year even though it can be traumatic to me (ghosts). Another thing I love is witches with red hair, because I resemble that remark!
Well…if I was clay, this is what I would look like! Dawn Schiller from ODDFAE just posted this on eBay!!! I love mahwah (also a town in New Jersey), Dawn! Go look at the other views at the eBay link, she is hysterical.


She also did some pieces at sandy camp out of the Cernit in the new formulation (formerly known as G-Clay), how cute are these guys?? She is also the one that helped me make the Snakeman, posted previously in this blog. She is worth the time to look at what she does.


The Crabby one is made from the flesh color and highlighted with china paints. And the smiling friendly guy is made from what the Cernit clay people call biscuit. It is a color very much like bisque porcelain clay, they really did a wonderful job with this new formulation of Cernit. They kept the colors and the porcelain effect intact with out all of the weird things that Cernit used to do. LOL!!! it looks like mug shots for gnomes, ogres, goblins, and oddfae...perfect for the Halloween holiday. The Biscuit, Champagne, and Flesh colors are all excellent for making dolls and faces, hands, body parts, and feet.


It is scary to me what some people can do with clay, but in an oh so wonderful way!!


Photos of Oddies by Irene Niehorster, witch photo Dawn Schiller